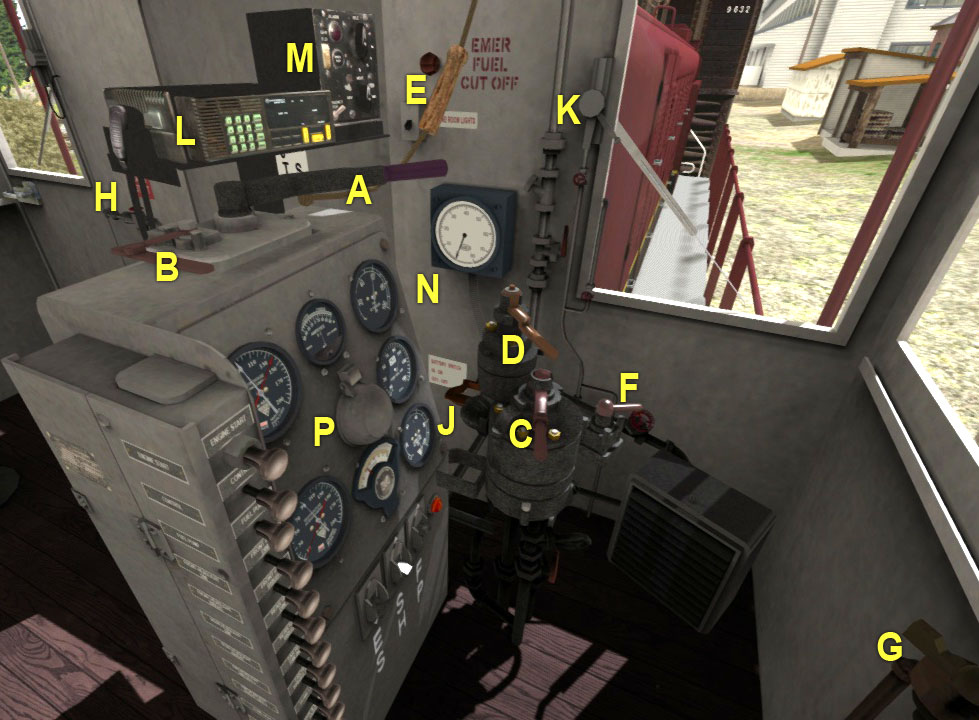
Cab controls (and keyboard equivalents, where applicable; n/f = non-functional)
| A | Throttle ( A / D ) | |
| B | Reverser ( W / S ) | |
| C | Train Brake ( [ / ] ) | |
| D | Locomotive Brake ( ; / ' ) | |
| E | Horn ( Space bar ) | |
| F | Bell ( B ) | |
| G | Sander ( X ) | |
| H | Emergency brake switch ( Backspace ) | |
| J | Battery switch (click and push right-left) | |
| K | Wiper ( V or click on any motor ) | |
| L | Radio ( n/f ) | |
| M | Multiple Unit Control ( n/f ) | |
| N | Speedometer | |
| P | Control Panel ( See below ) |
In addition, you can operate the left- and right-side windows using the mouse.
Hit the left or right arrow keys to access a custom view of the control panel...
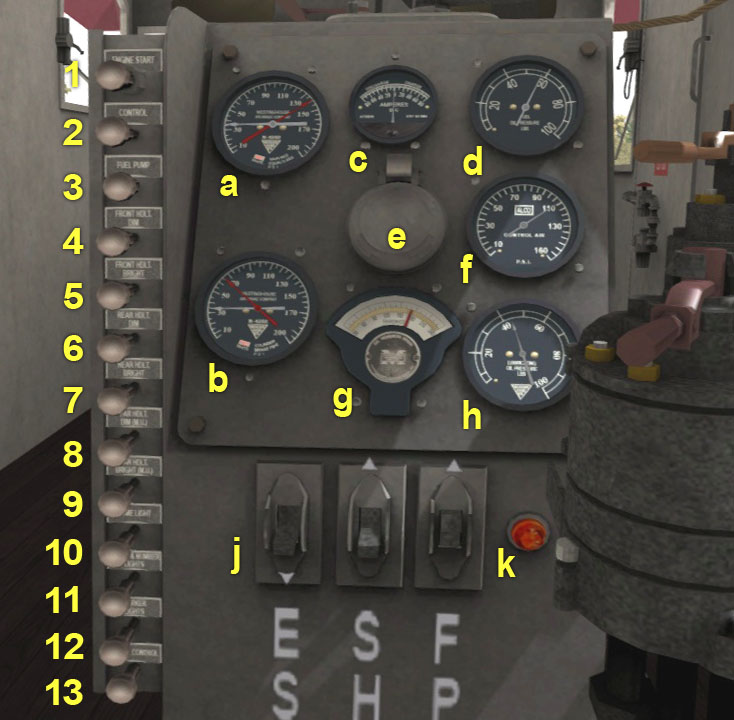
Control Panel (and keyboard equivalents, where applicable; n/f = non-functional)
| Gauges | Pushbuttons | |||
| a | Red - Main reservoir pressure, psi | 1 | Engine start | |
| White - Equalizing reservoir pressure, psi | 2 | M.U. control ( n/f ) | ||
| b | Red - Brake cylinder pressure, psi | 3 | Fuel pump | |
| White - Brake pipe pressure, psi | 4 | Front headlight, dim | ||
| c | Motor current, amperes | 5 | Front headlight, bright | |
| d | Fuel pressure, psi | 6 | Rear headlight, dim | |
| e | Gauge light bulb cover ( n/f ) | 7 | Rear headlight, bright | |
| f | Control air, psi | 8 | Far headlight, dim (M.U.) ( n/f ) | |
| g | Lube oil temperature, °F | 9 | Far headlight, bright (M.U.) ( n/f ) | |
| h | Lube oil pressure, psi | 10 | Dome light ( L ) | |
| j | Series-shunt-parallel switches ( n/f ) | 11 | Gauge & number lights ( K ) | |
| k | Overload indicator light (n/f ) | 12 | Marker lights ( n/f ) | |
| 13 | Motor control |
Special Operating Instructions
Brakes
The train brake, which is based on Westinghouse Model H-6, works as follows when the handle is rotated counterclockwise:
- Release: Does nothing. In the real world the Release position allows for rapid charging of the brake pipe, which releases all the brakes in the train except for those of the locomotive itself. If left in that position, there will be a small but audible amount of air leakage -- enough to remind the engineer to move the handle to the Running position. In RailWorks, pressure recharge occurs in both the Release and Running positions
- Running: This is the normal, at-rest position. Other than the pressure recharge function mentioned above, nothing happens during normal operation nor should it.
- Self Lapped: Maintains the current brake pipe pressure at a constant level.
- Apply: Releases air from the brake pipe. Actually, it releases air from the equalizer reservoir. The engineer watches the gauges until the desired pressure is reached, then moves the handle to the Lap position. The brake pressure bleeds off until it matches the equalizer pressure. The longer the train, the longer this takes. In RailWorks, the brake pipe pressure actually does lag the equalizer pressure by a little, but not much and without regard to train length.
- Emergency: Dumps the brake line.
The locomotive brake, or independent brake, has Release and Apply positions only. Use the locomotive brake only when operating light locomotive (i.e. without a consist). Application of either the train brake or the locomotive brake affects the main reservoir pressure but only slightly.
Start - Stop
Be sure to shut the engine down and re-start it. You can shut down using the “green-key” icon on the graphic UI or, with the locomotive at rest, disconnect the fuel pump using the control panel pushbutton. Similarly, you can also re-start the engine using the green-key icon on the graphic UI, but it’s more fun to do it manually. Push in the “Motor Control” button (bottommost one), push in the battery switch, and push in the “Fuel Pump” button. Then push and hold the “Engine Start” button (topmost one) for a few seconds.
Lights
Front and rear headlight switches
- Headlights may be operated using the H-key or clicking the 2-state UI icon, as is typical.
- Pressing Front Bright is equivalent to Headlights state 1.
- Pressing Rear Bright is equivalent to Headlights state 2.
- Dim headlights are independently operated except as follows:
Pressing Front Bright disables Front Dim.
Pressing Rear Bright disables Rear Dim.
Selecting Headlights state 1 disables Front Dim.
Selecting Headlights state 2 disables Rear Dim.
Selecting Headlights state 0 has no effect on any dim lights.
Cab lights respond to direct clicks on the lights, the "Dome Light" pushbutton, and to the L key.
Gauge lights respond to the "Gauge & Number Lights" pushbutton and to the K key.